A lot of work has been done on the BBC micro:bit and we’ve produced a lot of documentation along the way. This growing collection of videos and code will give you further understanding about this exciting project.
Most of the videos feature an Android application I wrote to enable the testing and demonstration of the many Bluetooth® capabilities for the BBC micro:bit.
In order to fully use the application and enjoy your micro:bit’s Bluetooth capabilities, you need a hex file which contains the full list of Bluetooth “services”. The hex file on your micro:bit contains all the services but the animation it runs means you cannot set the LED display over Bluetooth. This hex file should get you started. Others are listed below.
To use Bluetooth with the micro:bit you need to pair it with your phone or tablet. The pairing process is also demonstrated below.
Videos
BBC micro:bit Basic Bluetooth Capabilities Demo
BBC micro:bit Heart Rate Histogram
I’ve combined my love of cycling with my love of the micro:bit! Cyclists often use a training technique involving dividing their measured heart rate during a training session into 5 bands or ‘zones’. They monitor the distribution of the time their heart rate has spent in each zone as a histogram during training with the aim that it have a certain shape or bias for a given intensity of training. Here’s a screenshot from a cycling analytics system I use:
The heart rate zone histogram is on the right of course. Those 5 zones got me thinking. The micro:bit has a 5 x 5 LED matrix so what if….. I somehow hooked up a heart rate monitor (over Bluetooth of course!) and displayed a real-time histogram on the micro:bit so that I had a small, wearable heart rate zone training monitor? There was only one way to find out…
| micro:bit Bluetooth heart rate zone monitor |
At the top of the image, you can see my Bluetooth® Polar heart rate monitor which I strap around my chest. It transmits heart rate measurements approximately once per second to my phone which is running my multi-purpose micro:bit demo to which I’ve added my new heart rate zone demo. The phone displays a histogram which is updated in real time along with other details and uses the micro:bit’s Bluetooth LED Service to mirror the histogram onto the micro:bit LED grid. Simples!
BBC micro:bit Plays Name That Fruit!
BBC micro:bit Temperature Alarm
#include "MicroBit.h"
 * Temperature Alarm

 * Uses the Bluetooth Event Service to inform registered clients whenever the temperature falls below xx or rises above yy

MicroBit uBit;

uint16_t state      = 0; // 0=ok, 1=alarming because it's cold, 2=alarming because it's hot

uint16_t ok         = 0;

uint16_t any        = 0;

uint16_t temp_alarm = 9000;

uint16_t set_lower  = 9001;

uint16_t set_upper  = 9002;

uint16_t cold       = 1;

uint16_t hot        = 2;

uint8_t  upper      = 24;

uint8_t  lower      = 19;

int reading_count   = 0;

void onSetLower(MicroBitEvent e)

 lower = e.value;

    uBit.display.scroll("L=");

    uBit.display.scrollAsync(lower);

void onSetUpper(MicroBitEvent e)

 upper = e.value;

    uBit.display.scroll("U=");

    uBit.display.scrollAsync(upper);

void onTemperatureReading(MicroBitEvent e)

 int temperature = uBit.thermometer.getTemperature();

 reading_count++;

 if (reading_count == 10) {

   uBit.display.scrollAsync(temperature);

   reading_count = 0;

 if (temperature > upper && state == ok) {

     MicroBitEvent evt(temp_alarm, hot);

  state = hot;

  return;

 if (temperature < lower && state == ok) {

     MicroBitEvent evt(temp_alarm, cold);

  state = cold;

  return;

 if (temperature >= lower && temperature <= upper && state != ok) {

     MicroBitEvent evt(temp_alarm, ok);

  state = ok;

void app_main()

  uBit.display.scrollAsync("TEMP ALARM");

  new MicroBitTemperatureService(*uBit.ble, uBit.thermometer);

  // listen for client events which set the upper and lower temperature limits

  uBit.MessageBus.listen(set_lower, any, onSetLower);

  uBit.MessageBus.listen(set_upper, any, onSetUpper);

  // listen to the temperature sensor

  uBit.MessageBus.listen(MICROBIT_ID_THERMOMETER, MICROBIT_THERMOMETER_EVT_UPDATE, onTemperatureReading);
BBC micro:bit Basic Squirrel Counter
How to Pair Your BBC micro:bit with an Android Phone or Tablet
Bluetooth Controlled Kitronix micro:bit Buggy
Kitronik sell a nice buggy kit which is designed to follow lines on the ground. I reprogrammed it to respond to event messages delivered over Bluetooth® from a smartphone application using the Bluetooth Event Service so I could remote control it.
Information about the micro:bit Bluetooth Event Service can be found here:
http://lancaster-university.github.io/microbit-docs/ble/event-service/
/*
The MIT License (MIT)

Copyright (c) 2016 British Broadcasting Corporation.

This software is provided by Lancaster University by arrangement with the BBC.

Permission is hereby granted, free of charge, to any person obtaining a

copy of this software and associated documentation files (the "Software"),

to deal in the Software without restriction, including without limitation

the rights to use, copy, modify, merge, publish, distribute, sublicense,

and/or sell copies of the Software, and to permit persons to whom the

Software is furnished to do so, subject to the following conditions:

The above copyright notice and this permission notice shall be included in

all copies or substantial portions of the Software.

THE SOFTWARE IS PROVIDED "AS IS", WITHOUT WARRANTY OF ANY KIND, EXPRESS OR

IMPLIED, INCLUDING BUT NOT LIMITED TO THE WARRANTIES OF MERCHANTABILITY,

FITNESS FOR A PARTICULAR PURPOSE AND NONINFRINGEMENT. IN NO EVENT SHALL

THE AUTHORS OR COPYRIGHT HOLDERS BE LIABLE FOR ANY CLAIM, DAMAGES OR OTHER

LIABILITY, WHETHER IN AN ACTION OF CONTRACT, TORT OR OTHERWISE, ARISING

FROM, OUT OF OR IN CONNECTION WITH THE SOFTWARE OR THE USE OR OTHER

DEALINGS IN THE SOFTWARE.

#include "MicroBit.h"

#include "MicroBitSamples.h"

#ifdef MICROBIT_GAMEPAD

MicroBit uBit;

#define MES_DPAD_CONTROLLER                 1104

#define MES_DPAD_1_BUTTON_UP_ON             1

#define MES_DPAD_1_BUTTON_UP_OFF            2

#define MES_DPAD_1_BUTTON_DOWN_ON           3

#define MES_DPAD_1_BUTTON_DOWN_OFF          4

#define MES_DPAD_1_BUTTON_LEFT_ON           5

#define MES_DPAD_1_BUTTON_LEFT_OFF          6

#define MES_DPAD_1_BUTTON_RIGHT_ON          7

#define MES_DPAD_1_BUTTON_RIGHT_OFF         8

#define MES_DPAD_2_BUTTON_UP_ON             9

#define MES_DPAD_2_BUTTON_UP_OFF            10

#define MES_DPAD_2_BUTTON_DOWN_ON           11

#define MES_DPAD_2_BUTTON_DOWN_OFF          12

#define MES_DPAD_2_BUTTON_LEFT_ON           13

#define MES_DPAD_2_BUTTON_LEFT_OFF          14

#define MES_DPAD_2_BUTTON_RIGHT_ON          15

#define MES_DPAD_2_BUTTON_RIGHT_OFF         16

int pin0, pin8, pin12, pin16 = 0;

int drive = 0;

void onControllerEvent(MicroBitEvent e)

  if (e.value == MES_DPAD_2_BUTTON_UP_ON) {

      pin12 = 1;

      pin16 = 1;

      drive = 1;

  } else {

    if (e.value == MES_DPAD_2_BUTTON_UP_OFF) {

      pin12 = 0;

      pin16 = 0;

      drive = 0;

  if (drive == 1) {

      if (e.value == MES_DPAD_1_BUTTON_LEFT_ON) {

          pin12 = 1;

          pin16 = 0;

      } else {

          if (e.value == MES_DPAD_1_BUTTON_RIGHT_ON) {

              pin12 = 0;

              pin16 = 1;

          } else {

              if (e.value == MES_DPAD_1_BUTTON_LEFT_OFF || e.value == MES_DPAD_1_BUTTON_RIGHT_OFF) {

                  pin12 = 1;

                  pin16 = 1;

  uBit.io.P0.setDigitalValue(pin0);

  uBit.io.P8.setDigitalValue(pin8);

  uBit.io.P12.setDigitalValue(pin12);

  uBit.io.P16.setDigitalValue(pin16);

int main()

    // Initialise the micro:bit runtime.

    uBit.init();

    uBit.display.scroll("BUGGY!");

    uBit.messageBus.listen(MES_DPAD_CONTROLLER, 0, onControllerEvent);

    // If main exits, there may still be other fibers running or registered event handlers etc.

    // Simply release this fiber, which will mean we enter the scheduler. Worse case, we then

    // sit in the idle task forever, in a power efficient sleep.

    release_fiber();

#endif
The micro:bit Bluetooth Magnetometer (digital compass) Service
micro:bit contains a magnetometer or digital compass. The Bluetooth® profile includes a service called the Magnetometer Service and this allows connected devices to obtain the compass bearing of the micro:bit and for it to be updated in real-time. Here’s a demo…..
Information about the micro:bit Bluetooth Magnetometer Service can be found here:
http://lancaster-university.github.io/microbit-docs/ble/magnetometer-service/
And here’s the micro:bit code:
/*
#include "MicroBit.h"

#include "MicroBitSamples.h"

#ifdef MICROBIT_BLE_MAGNETOMETER

MicroBit uBit;

int main()

    // Initialise the micro:bit runtime.

    uBit.init();

    // Note GATT table size increased from default in MicroBitConfig.h

    // #define MICROBIT_SD_GATT_TABLE_SIZE             0x500

    new MicroBitMagnetometerService(*uBit.ble, uBit.compass);

    uBit.display.scroll("MAGNETOMETER");

    // If main exits, there may still be other fibers running or registered event handlers etc.

    // Simply release this fiber, which will mean we enter the scheduler. Worse case, we then

    // sit in the idle task forever, in a power efficient sleep.

    release_fiber();

#endif
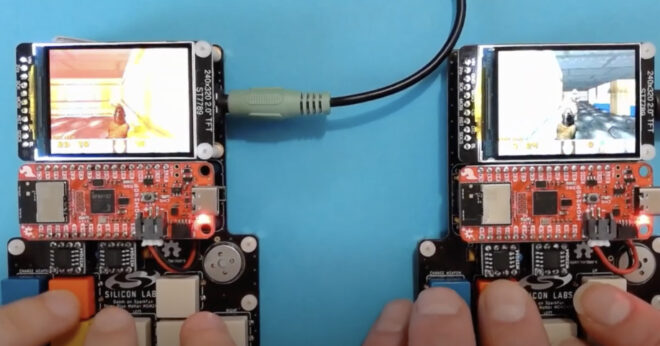
micro:bit Animal Vegetable Mineral Game Using Bluetooth UART Service
micro:bit now has a Bluetooth UART service which emulates serial data comms over Bluetooth low energy. I used it to implement the classic two player guessing game Animal Vegetable or Mineral. Simple!
And here’s the micro:bit code:
#include "MicroBit.h"
#include "MicroBitSamples.h"

#include "MicroBitUARTService.h"

#ifdef MICROBIT_UART

MicroBit uBit;

MicroBitUARTService *uart;

int connected = 0;

void onConnected(MicroBitEvent e)

    uBit.display.scroll("C");

    connected = 1;

    // my client will send ASCII strings terminated with the colon character

    ManagedString eom(":");

    while(1) {

        ManagedString msg = uart->readUntil(eom);

        uBit.display.scroll(msg);

void onDisconnected(MicroBitEvent e)

    uBit.display.scroll("D");

    connected = 0;

void onButtonA(MicroBitEvent e)

    if (connected == 0) {

        uBit.display.scroll("NC");

        return;

    uart->send("YES");

    uBit.display.scroll("YES");

void onButtonB(MicroBitEvent e)

    if (connected == 0) {

        uBit.display.scroll("NC");

        return;

    uart->send("NO");

    uBit.display.scroll("NO");

void onButtonAB(MicroBitEvent e)

    if (connected == 0) {

        uBit.display.scroll("NC");

        return;

    uart->send("GOT IT!!");

    uBit.display.scroll("GOT IT!!");

Recommend disabling the DFU and Event services in MicroBitConfig.h since they are not needed here:

#ifndef MICROBIT_BLE_DFU_SERVICE

#define MICROBIT_BLE_DFU_SERVICE                0

#endif

#ifndef MICROBIT_BLE_EVENT_SERVICE

#define MICROBIT_BLE_EVENT_SERVICE              0

#endif

int main()

    // Initialise the micro:bit runtime.

    uBit.init();

    uBit.messageBus.listen(MICROBIT_ID_BLE, MICROBIT_BLE_EVT_CONNECTED, onConnected);

    uBit.messageBus.listen(MICROBIT_ID_BLE, MICROBIT_BLE_EVT_DISCONNECTED, onDisconnected);

    uBit.messageBus.listen(MICROBIT_ID_BUTTON_A, MICROBIT_BUTTON_EVT_CLICK, onButtonA);

    uBit.messageBus.listen(MICROBIT_ID_BUTTON_B, MICROBIT_BUTTON_EVT_CLICK, onButtonB);

    uBit.messageBus.listen(MICROBIT_ID_BUTTON_AB, MICROBIT_BUTTON_EVT_CLICK, onButtonAB);

    // Note GATT table size increased from default in MicroBitConfig.h

    // #define MICROBIT_SD_GATT_TABLE_SIZE             0x500

    uart = new MicroBitUARTService(*uBit.ble, 32, 32);

    uBit.display.scroll("AVM");

    // If main exits, there may still be other fibers running or registered event handlers etc.

    // Simply release this fiber, which will mean we enter the scheduler. Worse case, we then

    // sit in the idle task forever, in a power efficient sleep.

    release_fiber();

#endif
Using the ARM mbed IDE to Select Bluetooth Services to Include in Your BBC micro:bit Application
The BBC micro:bit has a default Bluetooth®® profile which includes a range of “services”. Code Kingdom. No Bluetooth functionality is available from mico:python either. So if you want to exploit Bluetooth on your micro:bit beyond the small number of canned use cases supported by these code editors, it is recommended that you use ARM’s mbed IDE. This video shows you how, explains the issues and the workarounds to those issues.
Developing a Bluetooth Music Player Remote Control Using Only a Smartphone
How to Pair Your micro:bit with an iOS Device
Documentation
Lancaster University micro:bit runtime
The micro:bit Bluetooth Profile
Hex Files
Bluetooth All Services – Includes all Bluetooth® ‘services’ and no custom logic. Ideal for most demos available in the Android demonstrator application
Bluetooth Most Services, No Security – Includes all Bluetooth services except DFU. Has no security so pairing is not required and encryption is not used. Use at your own risk.
Buggy Controller – as used in the remote control buggy demo
Temperature Alarm – as used in the temperature alarm demo
Squirrel Counter – as used in the squirrel counter demo
Trivia Scoreboard – used for awarding stars for display on the Trivia Scoreboard
External Resources
https://www.microbit.co.uk/iet
http://www.samsung.com/uk/microbit/
https://www.techwillsaveus.com/microbit/
https://www.kitronik.co.uk/bbc-micro-bit-accessories.html
http://research.microsoft.com/en-us/projects/microbit/